Page Contents
Headings & Screen Readers
Headings, as seen above, allow students to access and navigate an index-like structure of your document (or web page) to jump from heading to heading to find information. When you create accessible headings, every student can scan your documents, regardless of whether they can see the content.
A screen reader is a type of Assistive Technology (AT) that reads (or speaks) what people with 20/20 vision see on a display. Screen readers allow the use of keyboard shortcuts, like pressing H to skip from heading to heading, T to skip from table to table, and Tab to skip from link to link.
Tips for Creating Accessible Headings
- Use the Heading 1, Heading 2, Heading 3, etc. styles already created in Word.
- You can update existing styles to match the formatting you’ve already set up.
- Create a well-formed heading hierarchy for your document.
- Use the Heading 1 style once per document or web page.
- Don’t skip heading levels (e.g., from a Heading 1 to a Heading 3).
- Note: Never use the Title or Subtitle styles in Word; these are not accessible to screen readers.
Heading Styles in Word
Figure 1 shows the heading styles available in Word. The more you use, the more will show up in your list. For example, a Heading 4 appears only after you’ve used a Heading 3.

Heading Hierarchy Example
Here is an example of a well-formed heading hierarchy. Heading 3s and 4s are indented to show the hierarchy structure, but it is unnecessary to do so in your documents.

Notice you can only go forward by one heading level at a time, but you can skip backward, like a Heading 4 to a Heading 2, to start a new section in your document.
To confirm you’ve built a logical, well-formed heading hierarchy, use the Accessibility Checker to ensure the “Missed heading level” category doesn’t appear. If you do see the category, fix the heading level(s) to move forward only a single level (e.g., from a Heading 2 to a Heading 3) at a time.
Updating Existing Heading Styles
What if I don’t want to change my text’s appearance? Can I keep how my text looks right now, but turn it into a heading?
Yes! Here’s how you keep your current styles but change your text into a heading. Let’s do this for the first heading in your document – Heading 1.
- Select the text that you want as your first heading (Heading 1).

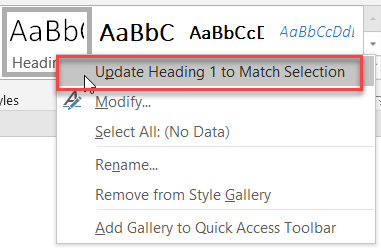
Figure 3. Selected Heading 1 text - In Home > Styles, right-click the Heading 1 style, and select Update Heading 1 to Match Selection.
Figure 4. Update Heading 1 to Match Selection After clicking Update Heading 1 to Match Selection, you’ll see the following results:- Your Heading 1 style will update to have the styles associated with the selected text.
- The selected text will be set as a Heading 1.
- The new Heading 1 will appear in the Navigation pane. (View > Navigation Pane)

- Select the text you want to update.
- Change how you want it to appear (if necessary).
- Right-click its corresponding style name in Home > Styles.
- Select Update [Style Name] to Match Selection.
This can be very handy when you need to quickly update an entire document. You can set the spacing to be identical between paragraphs with the Normal style. Or set font sizes to be larger or smaller for Heading 2s and Heading 3s. You could even modify a style manually.
Conclusion
Ultimately, headings created with a well-formed hierarchy help all of your students understand your documents better.
Additionally, headings greatly help students using a screen reader skip to information they need, as many students can already.

Leave a Reply