In this tutorial, you’ll learn how to add a document title to a Microsoft Word document. A title ensures your Word documents and resulting PDFs are more accessible for everyone.
A document title provides an easy-to-read title for all your students, including those using a screen reader. If the title is set, a screen reader states the title instead of the filename.
Ideally, you want to set the document title in the original source, but if you don’t have it, edit the PDF with Adobe Acrobat (not Adobe Reader).
Add a Document Title to Microsoft Word
Word provides a simple (yet somewhat hidden) way to add a document title.
Transcript – How to Add a Document Title to a Word Document (pdf) (73 KB)
- Copy the Heading 1 of your document to use as your title. (Optional)
- Go to File > Info > Properties > Title.
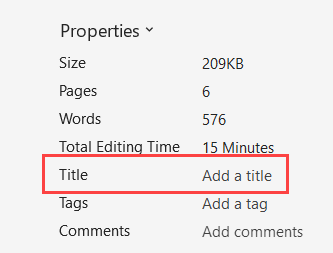
- Click “Add a title” and paste your Heading 1 into the textbox.
- Or, type in an easy-to-read title for your document (e.g., “ENGR 101 Fall 2021 Syllabus”).
- Save the document.
- Use Save As to convert to a PDF and successfully transfer the title to the PDF.
Set the Document Title in Adobe Acrobat
If you don’t have the original Word document for your PDF, you can still fix its missing title in Adobe Acrobat. Note: You cannot edit the title with Adobe Reader.
- Open the PDF in Adobe Acrobat.
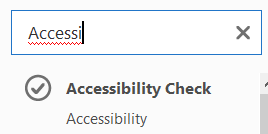
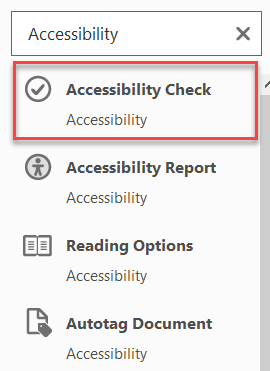
- In the Search tools textbox on the right, start typing “Accessibility” to search for Acrobat’s accessibility features.

- Select Accessibility Check to check the accessibility of your PDF.
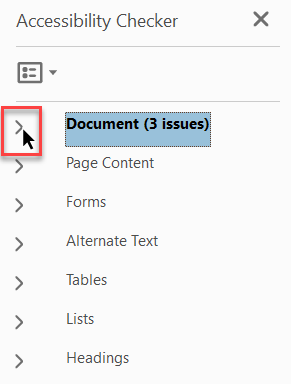
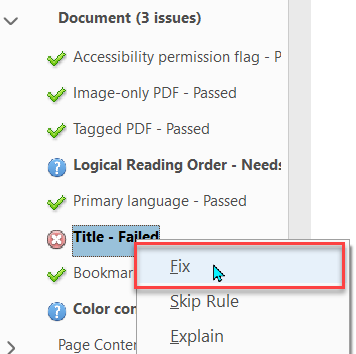
The Accessibility Checker panel opens on the left to show the accessibility issues Acrobat found with your PDF.
- Click the greater than symbol (>) next to “Document (# issues)” to open that section.
Note: Adobe Acrobat consistently flags two warnings (issues) within the Document section. Hence, if you see a number greater than 2, there’s likely an error in your PDF.
- Within the Document section, right-click Title – Failed, then choose Fix from the context menu.
-
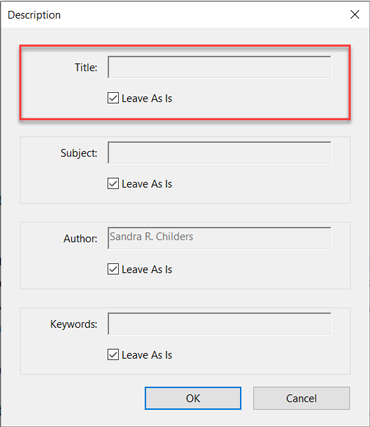
No Title in Original Source
If no title was set in the original source, a Description dialog window appears. The top section shows the missing title.
- Uncheck the “Leave As Is” checkbox and enter an easy-to-read title.
- Click OK to set the title.
- Save the PDF to keep your changes.
-
Title Set, but Not Set in PDF
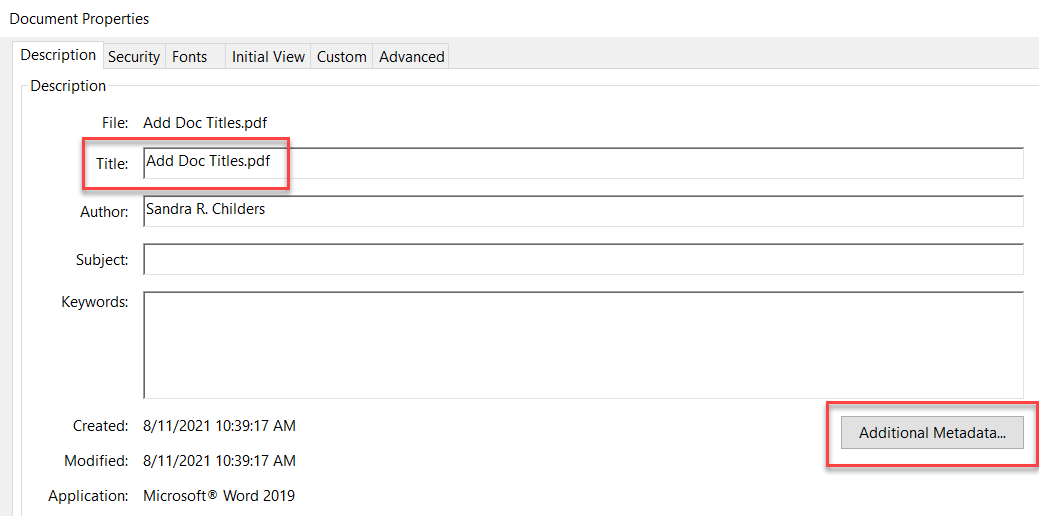
If a title was set in Word but unsuccessfully set in the PDF (e.g., the Save As function wasn’t used to convert), then selecting Fix will auto-fix the title. However, you should always confirm the title is easy to read.
- In Acrobat, go to File > Properties and view the Title on the Description tab.
- If the Document Title is not easy to read (or includes a filename), click the Additional Metadata… button at the middle-right of the dialog window.
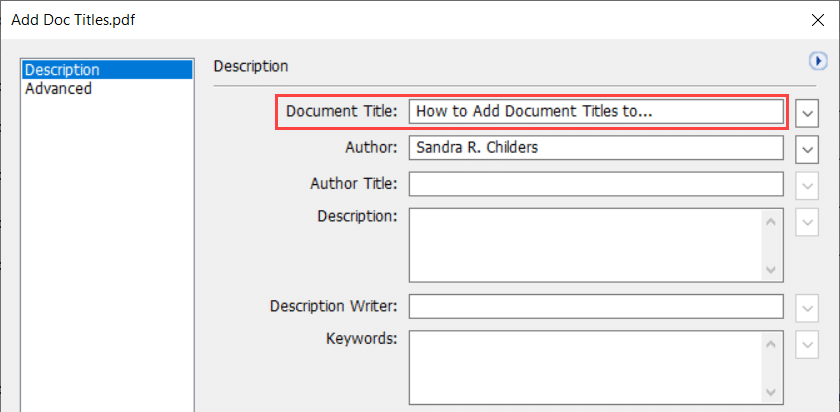
- Then, update the Document Title field to an easy-to-read title.
- Click OK once you’ve updated the Document Title.
- Click OK to update the PDF document properties.
- In Acrobat, go to File > Properties and view the Title on the Description tab.
-
- Save your changes.
Now, the PDF should display that title within the PDF tab. Additionally, when a student has multiple tabs open, it’s easy to find the document they need. (Even if they’re using a screen reader.)

Conclusion
Every document uploaded to Canvas needs a Document Title. This title helps your students find the correct document more easily and removes that pesky error shown in Canvas. (It’s a win-win!)

Leave a Reply